The real hero of the lab is the Bunsen burner. Be it a chemistry experiment or any big research work, nothing is complete without this burner. Today we will talk about it in full detail – where did it come from, how does it work, and how should it be used safely.
Scene from the Beginning
Bunsen burner is one such thing which is found in every lab. From small students to big scientists, everyone uses it. It is very important to know the design, working method and safety rules of this burner.
Today we will see the history of Bunsen burner, its parts, how the flame is produced, and ways to use it safely.
A Round of History of Bunsen Burner
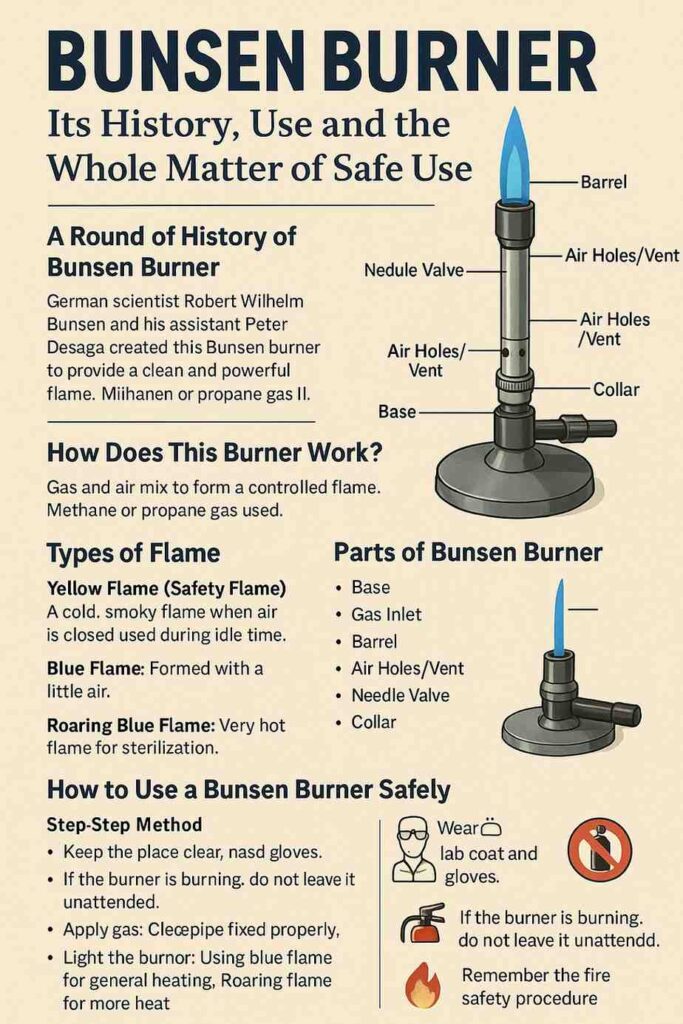
In 1855, German scientist Robert Wilhelm Bunsen and his assistant Peter Desaga created this burner. Earlier people used alcohol lamps or open flames, but they were unable to control the flame. Bunsen thought of making something that gives a clean and powerful flame, so he created this burner.
Fun fact: Bunsen not only invented the burner, he also invented spectroscopy, due to which the world got elements like cesium and rubidium.
How Does This Burner Work?
The simple principle is – gas and air get mixed to form a controlled flame. Methane or propane gas is used mostly. Its flame can be made small or big, heat can be made less or more – everything is adjustable.
Parts of Bunsen Burner
- Base – Keeps the burner stable, it does not fall.
- Gas Inlet – This is where gas enters the burner.
- Barrel – This is a long pipe where gas and air get mixed.
- Air Holes / Vent – These adjust how much air is to be mixed.
- Needle Valve – This controls how much gas flow is required.
- Collar – The part that opens and closes the air holes.
Types of Flame
- Yellow Flame (Safety Flame): When the air is closed, a cold and smoky flame is formed. This is used during idle time.
- Blue Flame: Forms when a little air is opened, perfect for normal heating.
- Roaring Blue Flame: Forms when full air is opened, very hot – used for sterilization (can heat up to 1500°C).
How to Use a Bunsen Burner Safely?
Step by Step Method
- Keep the place clear: Remove all paper, chemicals. Ventilation should be proper. Keep the fire extinguisher ready.
- Check the burner: Check if there is a crack in the hose, if there is a leak. Keep it on a stable surface.
- Apply gas: Fix the gas pipe properly. Gas should be off before starting.
- Light the burner: First close the air holes, light it with a striker or matchstick.
- Adjust the flame: Use blue flame for general heating. Roaring flame for more heat.
- Turning it off: Turn off the gas after the work is finished. Let it cool down, then remove it.
Safety Tips
- Wear goggles, lab coat and gloves.
- If the burner is burning, do not leave it unattended.
- Check for gas leakage, apply soap water and see if it bubbles.
- Pick up hot things with tongs.
- Remember the fire safety procedure.
Where is Bunsen Burner Used?
- Chemistry: Heating, flame test, chemical reactions.
- Microbiology: To sterilize tools.
- School/College Labs: To teach students.
- Material Science: To test materials by heating them.
Nowadays electric hot plates are also used, but the simplicity and control of Bunsen burner is still the best.
Mistakes People Make
- Heating with yellow flame – This is wrong, it will cause soot. Use blue flame for heating.
- Using too much or too less gas – the flame becomes unstable or goes off.
- Not checking the burner – It is dangerous if there is a leak or damage.
- To heat glassware quickly – heat slowly, otherwise it could break.
Modern Alternatives of the Day
- Electric Hot Plates: No flame, so safe.
- Alcohol Burners: Used when gas is not available.
- Induction Heaters: For special experiments.
But still, the charm of the Bunsen burner is different.
A Good Thing About the Bunsen Burner
People made gas stoves and torches after looking at the design of the Bunsen burner.
Metals are identified by the flame test – sodium is yellow, potassium is lilac.
The design has been almost the same since the 19th century – we call it classic engineering.
The Bottom Line
The Bunsen burner is not just a tool, it is a scientific legacy. No one knows how many experiments have been done in its flame from 1850s till today. Understand it properly, use it, and stay safe.
So Are You Ready to Start Experimenting?
Write your experience in the comments, and follow our blog for new lab techniques.
Disclaimer:
This blog is only for education. Always follow lab safety. Taking proper training and reading safety manual is mandatory before using the burner.


